Four Mile Trail: Your Complete Guide to Yosemite's Most Scenic Hike (2025)
Standing at Glacier Point after completing the grueling Four Mile Trail, I realized why this hike is considered Yosemite's most rewarding challenge. The panoramic views of Half Dome, Yosemite Falls, and the entire valley floor make every step of the 3,200-foot ascent worthwhile. Whether you're planning your first attempt or looking to optimize your experience, this comprehensive guide covers everything you need to know about conquering the four mile trail. Explore National Parks Store has been your trusted source for hiking guides since 2020.
Trail Overview & Quick Facts
The four mile trail stands as one of Yosemite National Park's most challenging yet rewarding day hikes. Despite its name suggesting a 4-mile journey, the trail actually measures 4.8 miles one-way from Yosemite Valley to Glacier Point, totaling 9.6 miles round-trip. This discrepancy stems from the original 1872 construction when the trail was indeed 4 miles, but subsequent rerouting extended the distance while the historic name remained.
Key Trail Statistics
- Distance: 4.8 miles one-way (9.6 miles round-trip)
- Elevation Gain: 3,200 feet
- Difficulty: Strenuous
- Time Required: 3-4 hours up, 2-3 hours down
- Switchbacks: 58 total
- Trail Type: Out and back or point-to-point
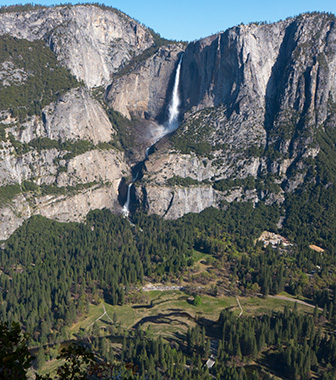
What sets this trail apart from other Yosemite adventures is its remarkable showcase of the park's most iconic landmarks. From various vantage points along the switchbacking path, hikers witness stunning views of El Capitan's granite face, the thundering cascades of Yosemite Falls, the distinctive profile of Half Dome, and the serene Merced River threading through the valley floor. The trail serves as a natural viewfinder, framing these geological masterpieces from angles impossible to capture elsewhere.
Unlike many trails that save the best views for the summit, the four mile trail delivers spectacular scenery throughout the journey. The carefully engineered switchbacks, originally designed as a toll road in 1872, provide consistent photo opportunities and rest stops with breathtaking backdrops. This makes the challenging ascent more manageable psychologically, as each turn reveals new perspectives that reward your efforts.
My Personal Experience
I'll never forget my first attempt at the four mile trail in June 2023. Starting at 6:30 AM from the valley floor, I was immediately struck by how the morning light painted the granite walls in golden hues. The initial mile through the forest floor was deceptively gentle, lulling me into a false sense of security before the real climb began.
By the third switchback, I understood why rangers emphasize starting early. Even in the morning, the exposed granite faces radiated heat, and I was grateful for my proper hiking footwear that provided crucial ankle support on the loose decomposed granite. The trail surface, while well-maintained, can be surprisingly slippery, especially where fine granite sand accumulates on the paved sections.
Lessons Learned from Multiple Hikes
- Water is everything: I burned through 3 liters on my first summer attempt
- Start before sunrise: 5:30 AM starts provide the best experience
- Layer management: Morning cold gives way to intense sun exposure
- Trekking poles help: Especially beneficial for the descent
- Union Point detour: Worth the extra 10 minutes for unique valley views
The psychological challenge proved as significant as the physical demands. Around switchback 25, doubt crept in—my legs burned, sweat stung my eyes despite sunglasses, and Glacier Point seemed impossibly distant. This is where proper mental preparation and realistic pacing become crucial. I learned to embrace the "rest step" technique that a ranger shared: pause momentarily with each step to let your rear leg bear your full weight, reducing fatigue in your forward-moving leg.
Reaching Union Point at mile 3.2 provided the motivational boost I needed. The panoramic view from this rocky outcrop encompasses the entire valley, offering a preview of the even grander spectacle awaiting at Glacier Point. From here, the final push through 13 more switchbacks felt manageable, especially knowing that the trail soon enters shaded forest before emerging at the famous overlook.
Complete Four Mile Trail hiking guide with detailed trail conditions and tips
Best Time to Hike & Seasonal Guide
Timing your four mile trail adventure correctly can mean the difference between a memorable experience and a grueling ordeal. The trail typically opens in May and closes in November or December, depending on snowfall, but within this window, conditions vary dramatically.
Spring (May-June): Peak Waterfall Season
Spring offers the most spectacular waterfall displays, with Yosemite Falls thundering at peak volume from snowmelt. However, this comes with challenges: unpredictable weather, possible trail closures due to late snow, and muddy conditions. The reward justifies the risk—witnessing Yosemite Falls at full power from the trail's various viewpoints creates an unforgettable soundtrack to your climb.
Summer (July-August): Peak Season Challenges
Summer brings guaranteed trail access but intense heat and crowds. I've experienced 95°F temperatures on the exposed granite sections, making early starts absolutely essential. The payoff includes reliable weather, full facility services at Glacier Point, and the longest daylight hours. Consider the heat similar to hiking in other challenging mountain trails where preparation determines success.
Fall (September-October): Sweet Spot
Fall represents the optimal hiking season for the four mile trail. Cooler temperatures, fewer crowds, and stable weather create ideal conditions. While waterfall flows diminish, the reduced crowds and comfortable temperatures make this my preferred season. The autumn light also provides superior photography conditions, with softer shadows and warmer tones illuminating the granite formations.
Essential Gear & Equipment
Proper equipment transforms the four mile trail from a potential survival situation into an enjoyable challenge. Based on multiple successful hikes and learning from early mistakes, here's your comprehensive gear guide organized by priority.
Critical Essentials (Non-Negotiable)
Hydration System
Minimum 2 liters for one-way hikes, 4 liters for round-trip. The trail offers no water sources, and dehydration incidents are common. I prefer hydration bladders for easy access during the climb.
Nalgene Sustain Water Bottle - BPA FreeFootwear
Sturdy hiking boots or trail runners with excellent traction. The decomposed granite can be surprisingly slippery, especially on descents. Ankle support prevents injuries on uneven surfaces.
Columbia Newton Ridge Waterproof Hiking BootsHighly Recommended Equipment
These items significantly improve your hiking experience and safety margin. While not absolutely essential, they address common challenges I've encountered on multiple four mile trail attempts.
Trekking Poles
Game-changers for both ascent and descent. They reduce knee stress by up to 25% and provide crucial stability on loose granite sections. Collapsible models work well for the varying terrain.
Cascade Mountain Tech Trekking PolesQuality trail running shoes can substitute for boots if you prefer lighter footwear and have strong ankles. Many experienced hikers choose this route for the reduced weight and improved comfort on long climbs. The key is ensuring adequate grip on granite surfaces.
Navigation & Safety
While the four mile trail is well-marked, safety equipment provides peace of mind and emergency preparedness. Early starts mean hiking in darkness, and weather can change rapidly at elevation.
First Aid Basics
Bandages, pain relievers, blister treatment
Remember that conditions on the four mile trail can mirror those found on other demanding hikes like challenging mountain ascents where proper preparation determines your success and safety.
Complete Trail Guide
Four Mile Trail Route Map
Yosemite Valley to Glacier Point
The four mile trail divides naturally into distinct sections, each presenting unique challenges and rewards. Understanding these segments helps with pacing, rest planning, and mental preparation for the journey ahead.
Section 1: Valley Floor to First Views (Miles 0-1.5)
Beginning near the Swinging Bridge in Yosemite Valley, the trail starts deceptively gentle through mixed conifer forest. The first mile gains only 500 feet of elevation, allowing for warm-up before the serious climbing begins. Key landmarks include crossing the Valley Loop Trail junction and reaching the Yosemite Wilderness boundary marker.
During this section, save energy for the challenges ahead while enjoying the last shaded stretches of the journey. The forest provides a peaceful contrast to the exposed climbing that dominates the remaining trail. Early morning hikers often spot deer and various bird species in this quieter section.
Section 2: The Switchback Gauntlet (Miles 1.5-3.2)
The character of the trail changes dramatically as you enter the main switchback section. Here, the four mile trail reveals its challenging nature with 35 switchbacks gaining 2,000 feet of elevation. The trail surface alternates between paved sections and natural granite, requiring attention to footing.
Switchback Strategy
- Pace yourself: Aim for 1-2 switchbacks between rest stops
- Use the views: Turn around frequently to appreciate your progress
- Stay hydrated: Small, frequent sips work better than large drinks
- Photo opportunities: Yosemite Falls views improve with each turn
This section tests your resolve as much as your fitness. The repetitive nature of switchbacks can become mentally challenging, but the expanding views provide constant motivation. Each turn reveals new perspectives of the valley landmarks, from El Capitan's imposing wall to the graceful cascade of Yosemite Falls.
Section 3: Union Point and the Final Push (Miles 3.2-4.8)
Union Point marks the psychological halfway point and provides the trail's most comprehensive valley viewpoint. The short detour (0.2 miles round-trip) offers spectacular photography opportunities and a well-deserved rest with 360-degree views of the granite landscape.
Beyond Union Point, 23 final switchbacks lead through increasingly dramatic granite formations before the trail enters forest approaching Glacier Point. The last mile provides blessed shade and marks the transition from exposed climbing to the forested plateau environment surrounding the famous overlook.
The final approach to Glacier Point often surprises first-time hikers with its gentle grade through pine forest. After hours of steep climbing, this forest walk provides mental preparation for the overwhelming vista that awaits at your destination.
Safety Tips & Preparation
The four mile trail demands serious safety consideration due to its length, exposure, and elevation gain. National Park Service records show this trail generates more rescue calls than many realize, primarily due to dehydration, exhaustion, and inadequate preparation.
Pre-Hike Preparation
Physical conditioning should begin weeks before your attempt. Focus on cardiovascular fitness, leg strength, and hiking-specific preparation. I recommend training on stairs or steep local trails while carrying a weighted pack to simulate conditions. Your preparation should mirror what you'd do for other demanding outdoor activities.
Critical Safety Reminders
- Start early: 6 AM or earlier prevents heat-related emergencies
- Tell someone: Share your itinerary with rangers or friends
- Know your limits: Turn back if conditions deteriorate
- Weather awareness: Afternoon thunderstorms are common in summer
- Emergency contact: Cell service is limited but available at Glacier Point
Trail-Specific Hazards
The decomposed granite surface becomes particularly treacherous when wet or covered with pine needles. Sprained ankles rank as the most common injury on the trail, emphasizing the importance of proper footwear and attention to foot placement. Quality boots like those featured in our premium boot reviews provide the ankle support crucial for this terrain.
Exposure to sun and heat creates dangerous conditions throughout most of the trail. The granite walls act as reflective ovens, amplifying temperatures beyond air temperature readings. I've measured surface temperatures exceeding 120°F on summer afternoons, making sun protection and hydration absolutely critical.
Emergency Preparedness
Carry emergency supplies including extra water, high-energy snacks, basic first aid supplies, and emergency shelter. A lightweight emergency bivy or space blanket weighs ounces but could save your life if weather turns dangerous or injury prevents timely descent.
Rangers recommend having an emergency plan including turnaround times and weather contingencies. The mountain weather can change rapidly, transforming a pleasant hike into a dangerous situation. Like other challenging adventures requiring specialized gear, the four mile trail rewards preparation and punishes overconfidence.
What Hikers Are Saying
"Amazing trail with incredible views, but definitely challenging. Started at 6 AM and had the trail mostly to ourselves until about 9 AM. The switchbacks are relentless but the payoff is worth every step."
- Sarah M. (AllTrails Review)
"Brought way too little water on my first attempt in July and had to turn back at Union Point. Second time with proper preparation was magical - best views in Yosemite hands down."
- Mike R. (Reddit r/Yosemite)
"The trail is steep but well-maintained. Trekking poles made a huge difference, especially on the way down. Union Point is a must-see detour!"
- Jennifer L. (Quora Response)
Frequently Asked Questions
How difficult is the Four Mile Trail?
The Four Mile Trail is considered strenuous with 3,200 feet of elevation gain over 4.8 miles one-way. It features 58 switchbacks and takes most hikers 3-4 hours to ascend. The trail is well-maintained but exposed to sun for most of the route, making proper preparation essential. The difficulty compares to other challenging mountain trails, requiring good fitness, adequate water, and appropriate gear. The consistent steep grade means there are few opportunities to rest on flat sections, making pacing crucial for success.
When is the best time to hike Four Mile Trail?
The best time is May through October when the trail is fully open. Spring (May-June) offers the most spectacular waterfall views, while fall provides cooler temperatures and fewer crowds. Start early in summer to avoid afternoon heat. Winter closures typically occur from December through April due to snow and ice conditions. The trail can partially close during heavy snow years, with access limited to the first 3 miles. Check current conditions with park rangers before your visit, as weather and seasonal closures can change rapidly.
What should I bring for the Four Mile Trail hike?
Essential gear includes 2-4 liters of water, sturdy hiking boots, sun protection, layers for changing weather, snacks, headlamp, and first aid kit. Trekking poles are recommended for the steep switchbacks and can help reduce knee strain. Additional recommended items include a hat, sunglasses, extra socks, energy bars, and emergency shelter. The exposed nature of the trail makes sun protection critical, while the elevation gain demands adequate nutrition and hydration throughout the hike.
Can I hike Four Mile Trail in one direction only?
Yes, you can hike one-way by arranging transportation between Yosemite Valley and Glacier Point. However, there's no free shuttle service between these points. Park concessioners operate limited bus tours that may provide transportation, but seats aren't guaranteed, especially for the return trip from Glacier Point. Most hikers either complete the round-trip hike or arrange private transportation pickup. The one-way option is popular for those wanting to avoid the challenging descent, but requires careful planning and confirmed transportation arrangements.
Is the Four Mile Trail dangerous?
While not technically dangerous, the Four Mile Trail presents significant challenges that require respect and preparation. The main risks include dehydration, heat exhaustion, sprained ankles on loose granite sections, and getting caught in afternoon thunderstorms. The exposed nature of the trail provides little shade and can create oven-like conditions during summer afternoons. Most incidents involve inadequate preparation rather than trail hazards. Following safety guidelines, starting early, carrying adequate water, and knowing your limits minimize risks significantly. Rangers emphasize that proper preparation transforms this from a potentially dangerous undertaking into a challenging but safe adventure.
Where can I park for the Four Mile Trail?
Parking is available along Southside Drive in Yosemite Valley near the trailhead, though spaces fill quickly during peak season. Arrival before 7 AM significantly improves parking chances. Alternative parking exists at nearby day-use areas, but may require a short walk to the trailhead. The Valley shuttle system (stop #11) serves the Four Mile Trailhead, providing an alternative to driving. At Glacier Point, parking is more abundant but becomes crowded by mid-morning. Plan to arrive early or use the shuttle system to avoid parking frustrations that can delay your start time.
Conclusion
The four mile trail represents everything that makes Yosemite National Park extraordinary—challenging terrain, breathtaking vistas, and the profound satisfaction of earned achievement. This comprehensive guide has walked you through every aspect of planning and executing a successful hike, from gear selection to safety considerations and trail conditions.
Whether you're drawn by the spectacular views of Yosemite Falls, the panoramic valley vistas from Union Point, or the ultimate reward of Glacier Point's sweeping perspectives, proper preparation transforms this strenuous adventure into an unforgettable experience. The 4.8-mile climb with 3,200 feet of elevation gain demands respect, but rewards those who come prepared with some of the most spectacular scenery in the American national park system.
Remember that success on the four mile trail depends more on preparation than fitness level. Start training weeks in advance, invest in quality gear like the products recommended throughout this guide, and always prioritize safety over speed. The granite switchbacks will test your determination, but the views from Glacier Point provide memories that last a lifetime.
Ready to Tackle the Four Mile Trail?
Start planning your adventure with proper gear and preparation!
Explore More Hiking GuidesFor more expert hiking guides and gear reviews, visit Explore National Parks Store - your trusted source for outdoor adventure planning.