Complete Guide to Hiking Trolltunga: Norway's Most Epic Rock Formation
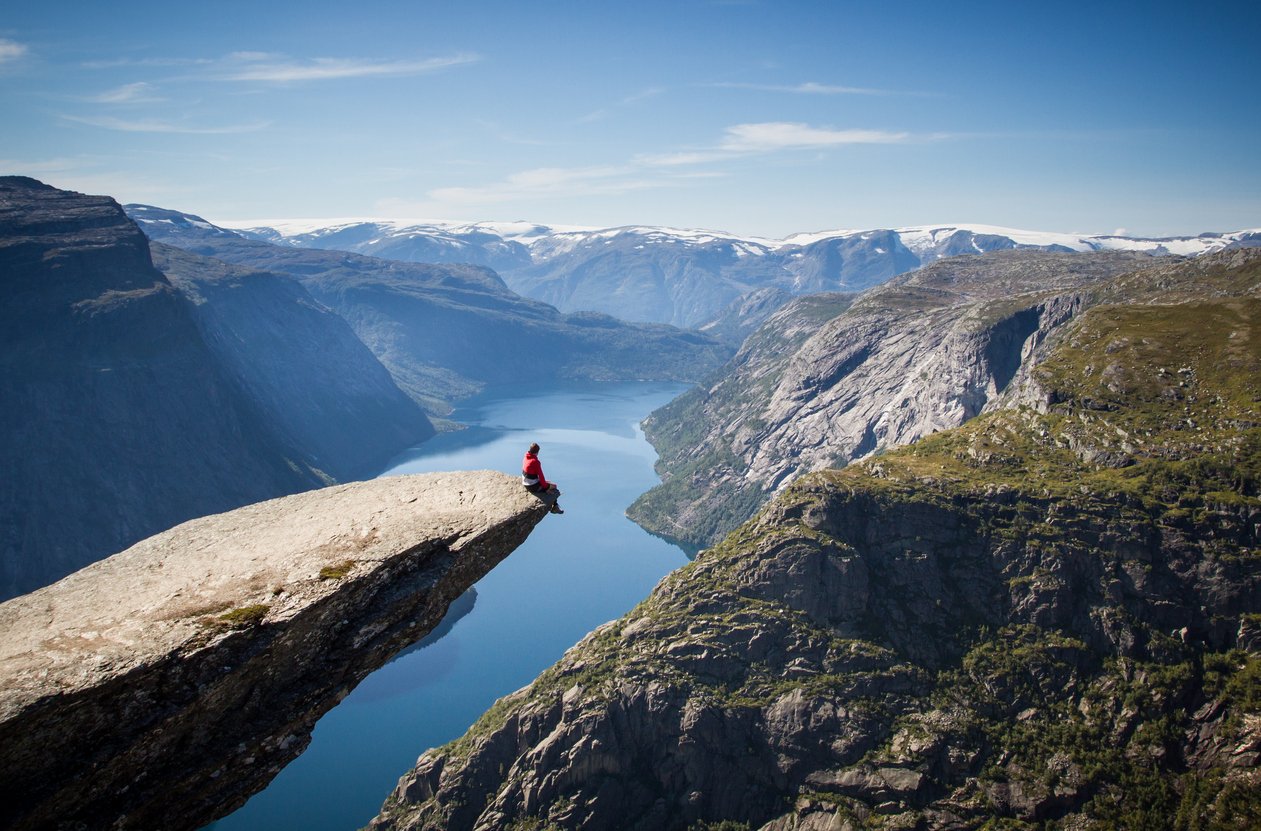
Standing on Norway's famous "Troll's Tongue," 700 meters above Lake Ringedalsvatnet, was the most exhilarating moment of my Norwegian hiking adventure. After completing this challenging 28-kilometer trek multiple times, I've gathered insider tips, route details, and practical advice to help you conquer one of the world's most spectacular hikes. Explore more adventure guides for your next outdoor expedition.
What Makes Trolltunga Special
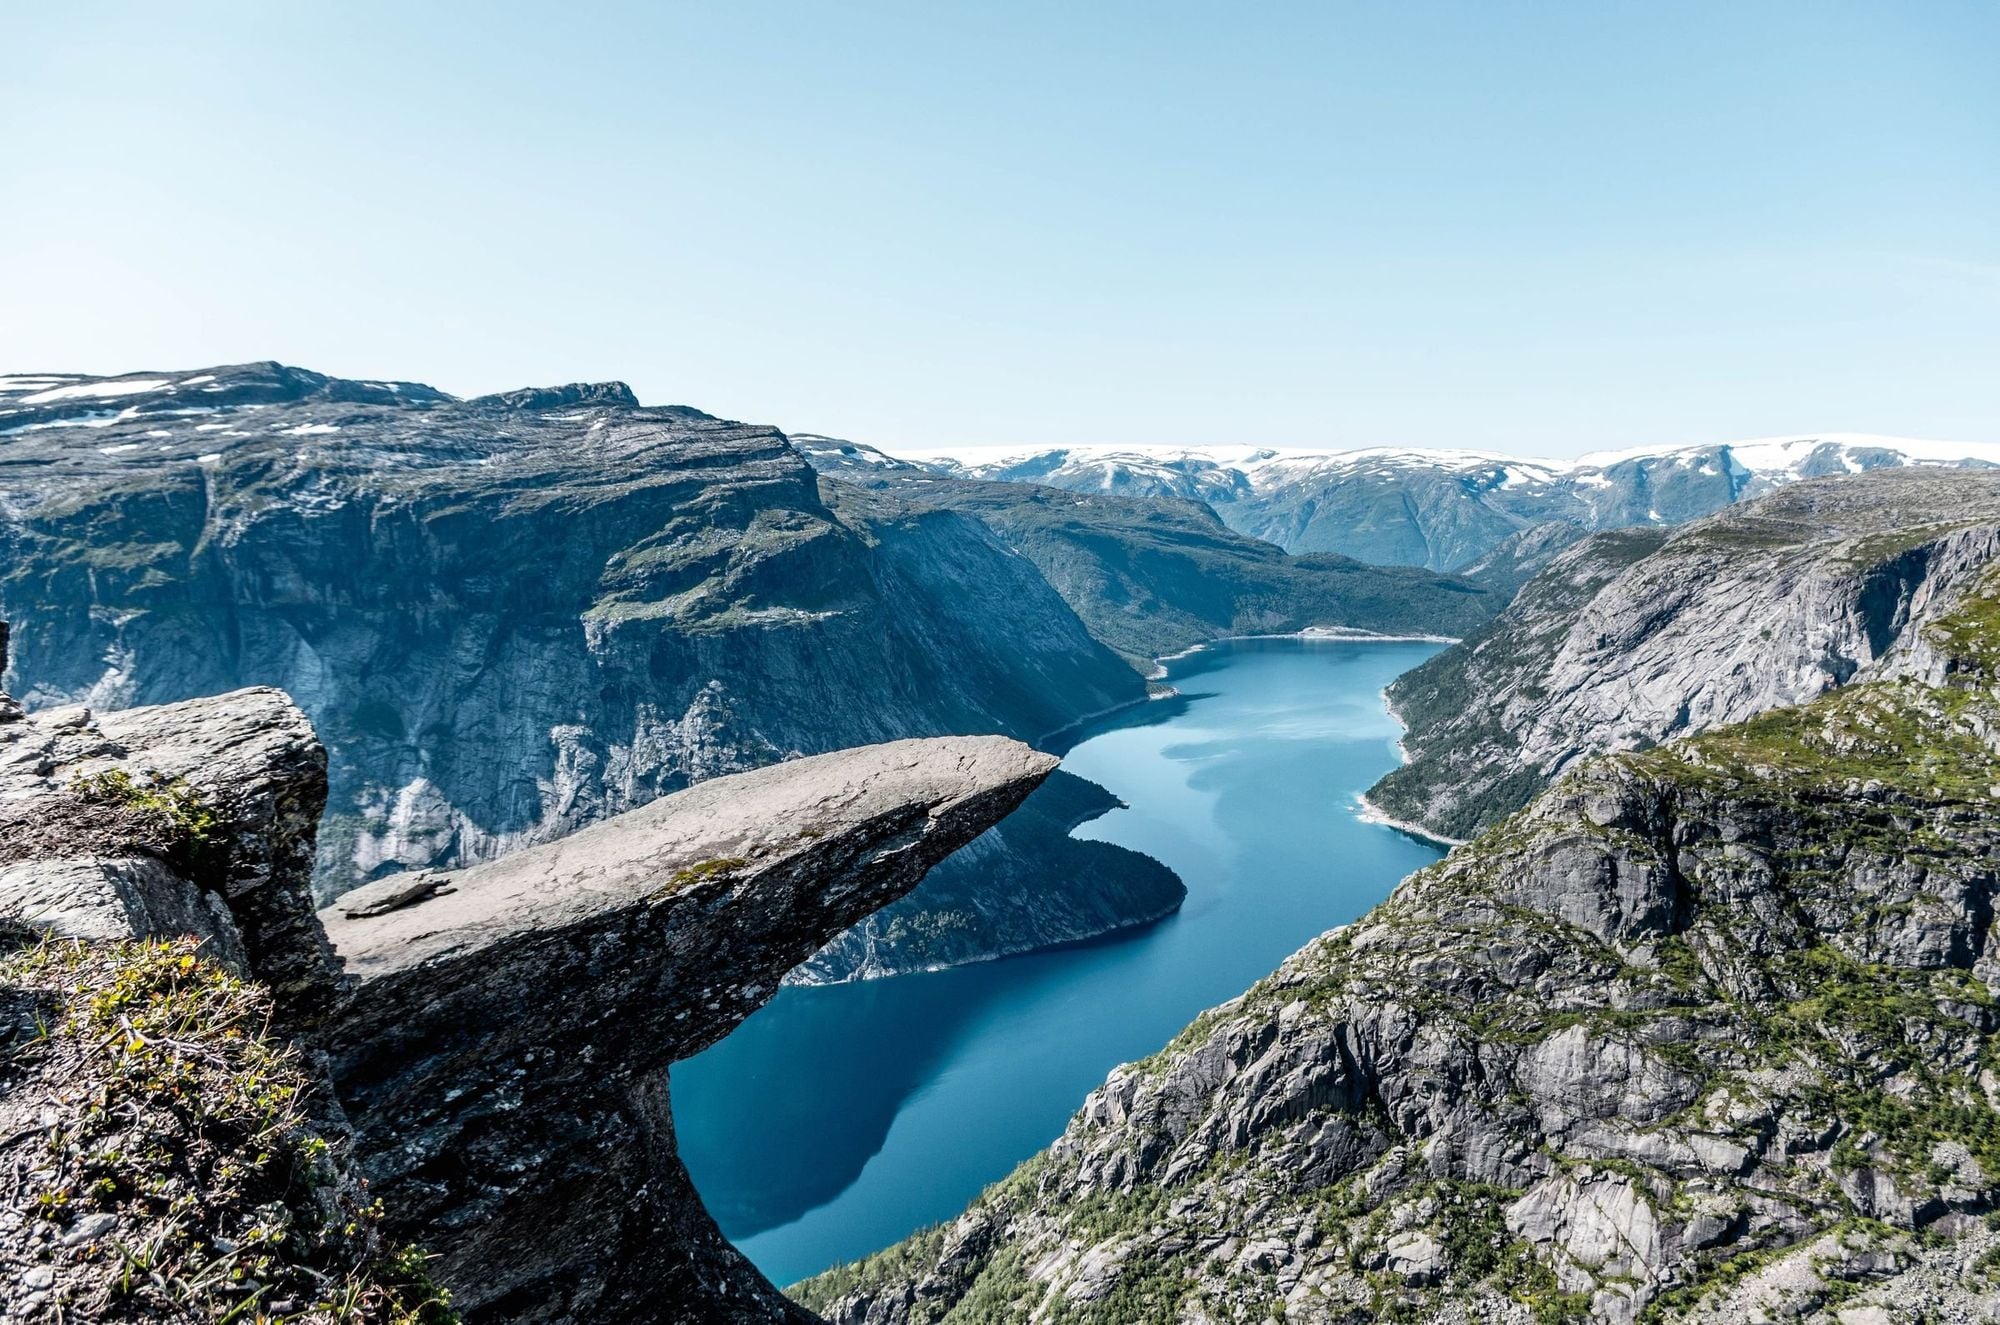
Trolltunga, literally translating to "Troll's Tongue," is arguably Norway's most photographed natural wonder. This horizontal rock shelf extends 700 meters above the pristine Lake Ringedalsvatnet, creating what feels like a natural diving board into thin air. When I first witnessed this geological marvel in person, I understood why it has become a bucket-list destination for adventurers worldwide.
What sets Trolltunga apart from other Norwegian hikes isn't just its dramatic appearance—it's the incredible journey to reach it. The rock formation was carved by glacial activity during the last ice age, approximately 10,000 years ago. Unlike famous hiking destinations that require technical climbing skills, Trolltunga is accessible to determined hikers with proper preparation and quality hiking boots.
Why Trolltunga Became Instagram Famous
From just 800 visitors in 2010 to over 80,000 annually today, Trolltunga's popularity exploded through social media. The dramatic photo opportunities, combined with Norway's growing reputation for adventure tourism, transformed this remote hiking destination into a global phenomenon.
The hike to Trolltunga takes you through diverse Norwegian landscapes: steep rocky ascents, plateau meadows dotted with mountain huts, pristine lakes reflecting snow-capped peaks, and ancient trails once used by traders crossing the Hardangervidda plateau. Each section offers unique challenges and rewards, making the journey as memorable as the destination itself.
During my multiple visits, I've experienced Trolltunga in different seasons and weather conditions. The summer crowds can be overwhelming, with wait times of up to 90 minutes for photos on busy Saturdays. However, the early morning golden light hitting the rock formation, or the ethereal mist rising from Lake Ringedalsvatnet at sunrise, creates moments that justify every challenging step of this epic adventure.
Planning Your Trolltunga Adventure
Best Time to Visit
After hiking Trolltunga in different seasons, I can confidently say that timing is crucial for both safety and enjoyment. The official hiking season runs from June 1st to September 30th, when the trail is accessible without mandatory guides. However, my experience suggests more nuanced timing considerations.
Optimal Months
- Early June: Fewer crowds, possible snow patches
- September: Best weather, moderate crowds
- Early July: Good conditions before peak season
Crowded Periods
- July-August: Peak season, long queues
- Saturdays: Up to 90-minute waits
- First sunny day after rain
Weather Considerations
Norwegian mountain weather changes rapidly, and I've experienced everything from blazing sunshine to sudden snowstorms in August. The local rangers emphasize checking weather forecasts, but I learned that microclimate conditions near Trolltunga can differ significantly from valley predictions. Pack layers regardless of the forecast.
Temperature variations are extreme: valley temperatures might reach 25°C (77°F) while Trolltunga sits in fog at 8°C (46°F). I always recommend bringing insulated footwear options and waterproof layers, even on seemingly perfect days.
Physical Fitness Requirements
Don't underestimate this hike's physical demands. The Norwegian hiking authority classifies Trolltunga as "Very Demanding" due to its distance and duration. During my first attempt, I watched several unprepared hikers turn back after the initial steep ascent, exhausted and demoralized.
Recommended Fitness Level
- Ability to hike 10+ hours with a loaded backpack
- Experience with rocky, uneven terrain
- Comfortable with 800+ meters elevation gain
- Previous long-distance hiking experience recommended
Complete Route Description

Starting Points and Distances
Understanding your starting point options is crucial for planning. I've hiked from all three parking areas, and each offers different advantages depending on your fitness level, budget, and schedule. The route follows ancient trade paths across the Hardangervidda plateau, marked consistently with red "T" symbols painted on rocks.
P1 Tyssedal
Distance: 38km return
Time: 12-15 hours
Elevation: 1040m gain
P2 Skjeggedal
Distance: 28km return
Time: 10-12 hours
Elevation: 800m gain
P3 Mågelitopp
Distance: 20km return
Time: 6-8 hours
Elevation: 320m gain
The Gryteskaret Challenge
The most challenging section begins after the initial plateau walk. Gryteskaret pass represents the hike's steepest, most technical climbing. I remember my first encounter with this rocky scramble—loose stones, steep grades, and the need for careful foot placement with every step. This 400-meter ascent over granite slabs tests your endurance and requires proper hiking footwear with excellent grip.
At the top of Gryteskaret, you'll find a massive five-meter boulder—a perfect landmark for photos and rest. Local guides told me this boulder gets completely buried in winter snow, illustrating the dramatic seasonal changes in this landscape. Take time here to appreciate the expanding views and refuel before continuing.
Plateau Crossing and Water Sources
Beyond Gryteskaret, the route traverses the spectacular Hardangervidda plateau—Europe's largest mountain plateau. This section offers relatively flat terrain but requires navigation skills in foggy conditions. I've encountered everything from crystal-clear views to complete whiteout conditions where following the red T-markers becomes critical.
Multiple crystal-clear streams cross the plateau, providing excellent water refill opportunities. Norwegian mountain water is generally safe to drink directly, though I always carry purification tablets for peace of mind. The bridges over major water crossings are sturdy and well-maintained, but I've seen hikers attempt dangerous shortcuts during low water periods—always use designated crossings.
Emergency Shelters
Three emergency shelters (Floren, Enden, and Tyssehl) contain sleeping bags, blankets, and emergency food supplies. These are only for genuine emergencies or severe weather situations. If you use supplies, please report it to authorities and consider donating to maintain these life-saving resources.
Final Approach to Trolltunga
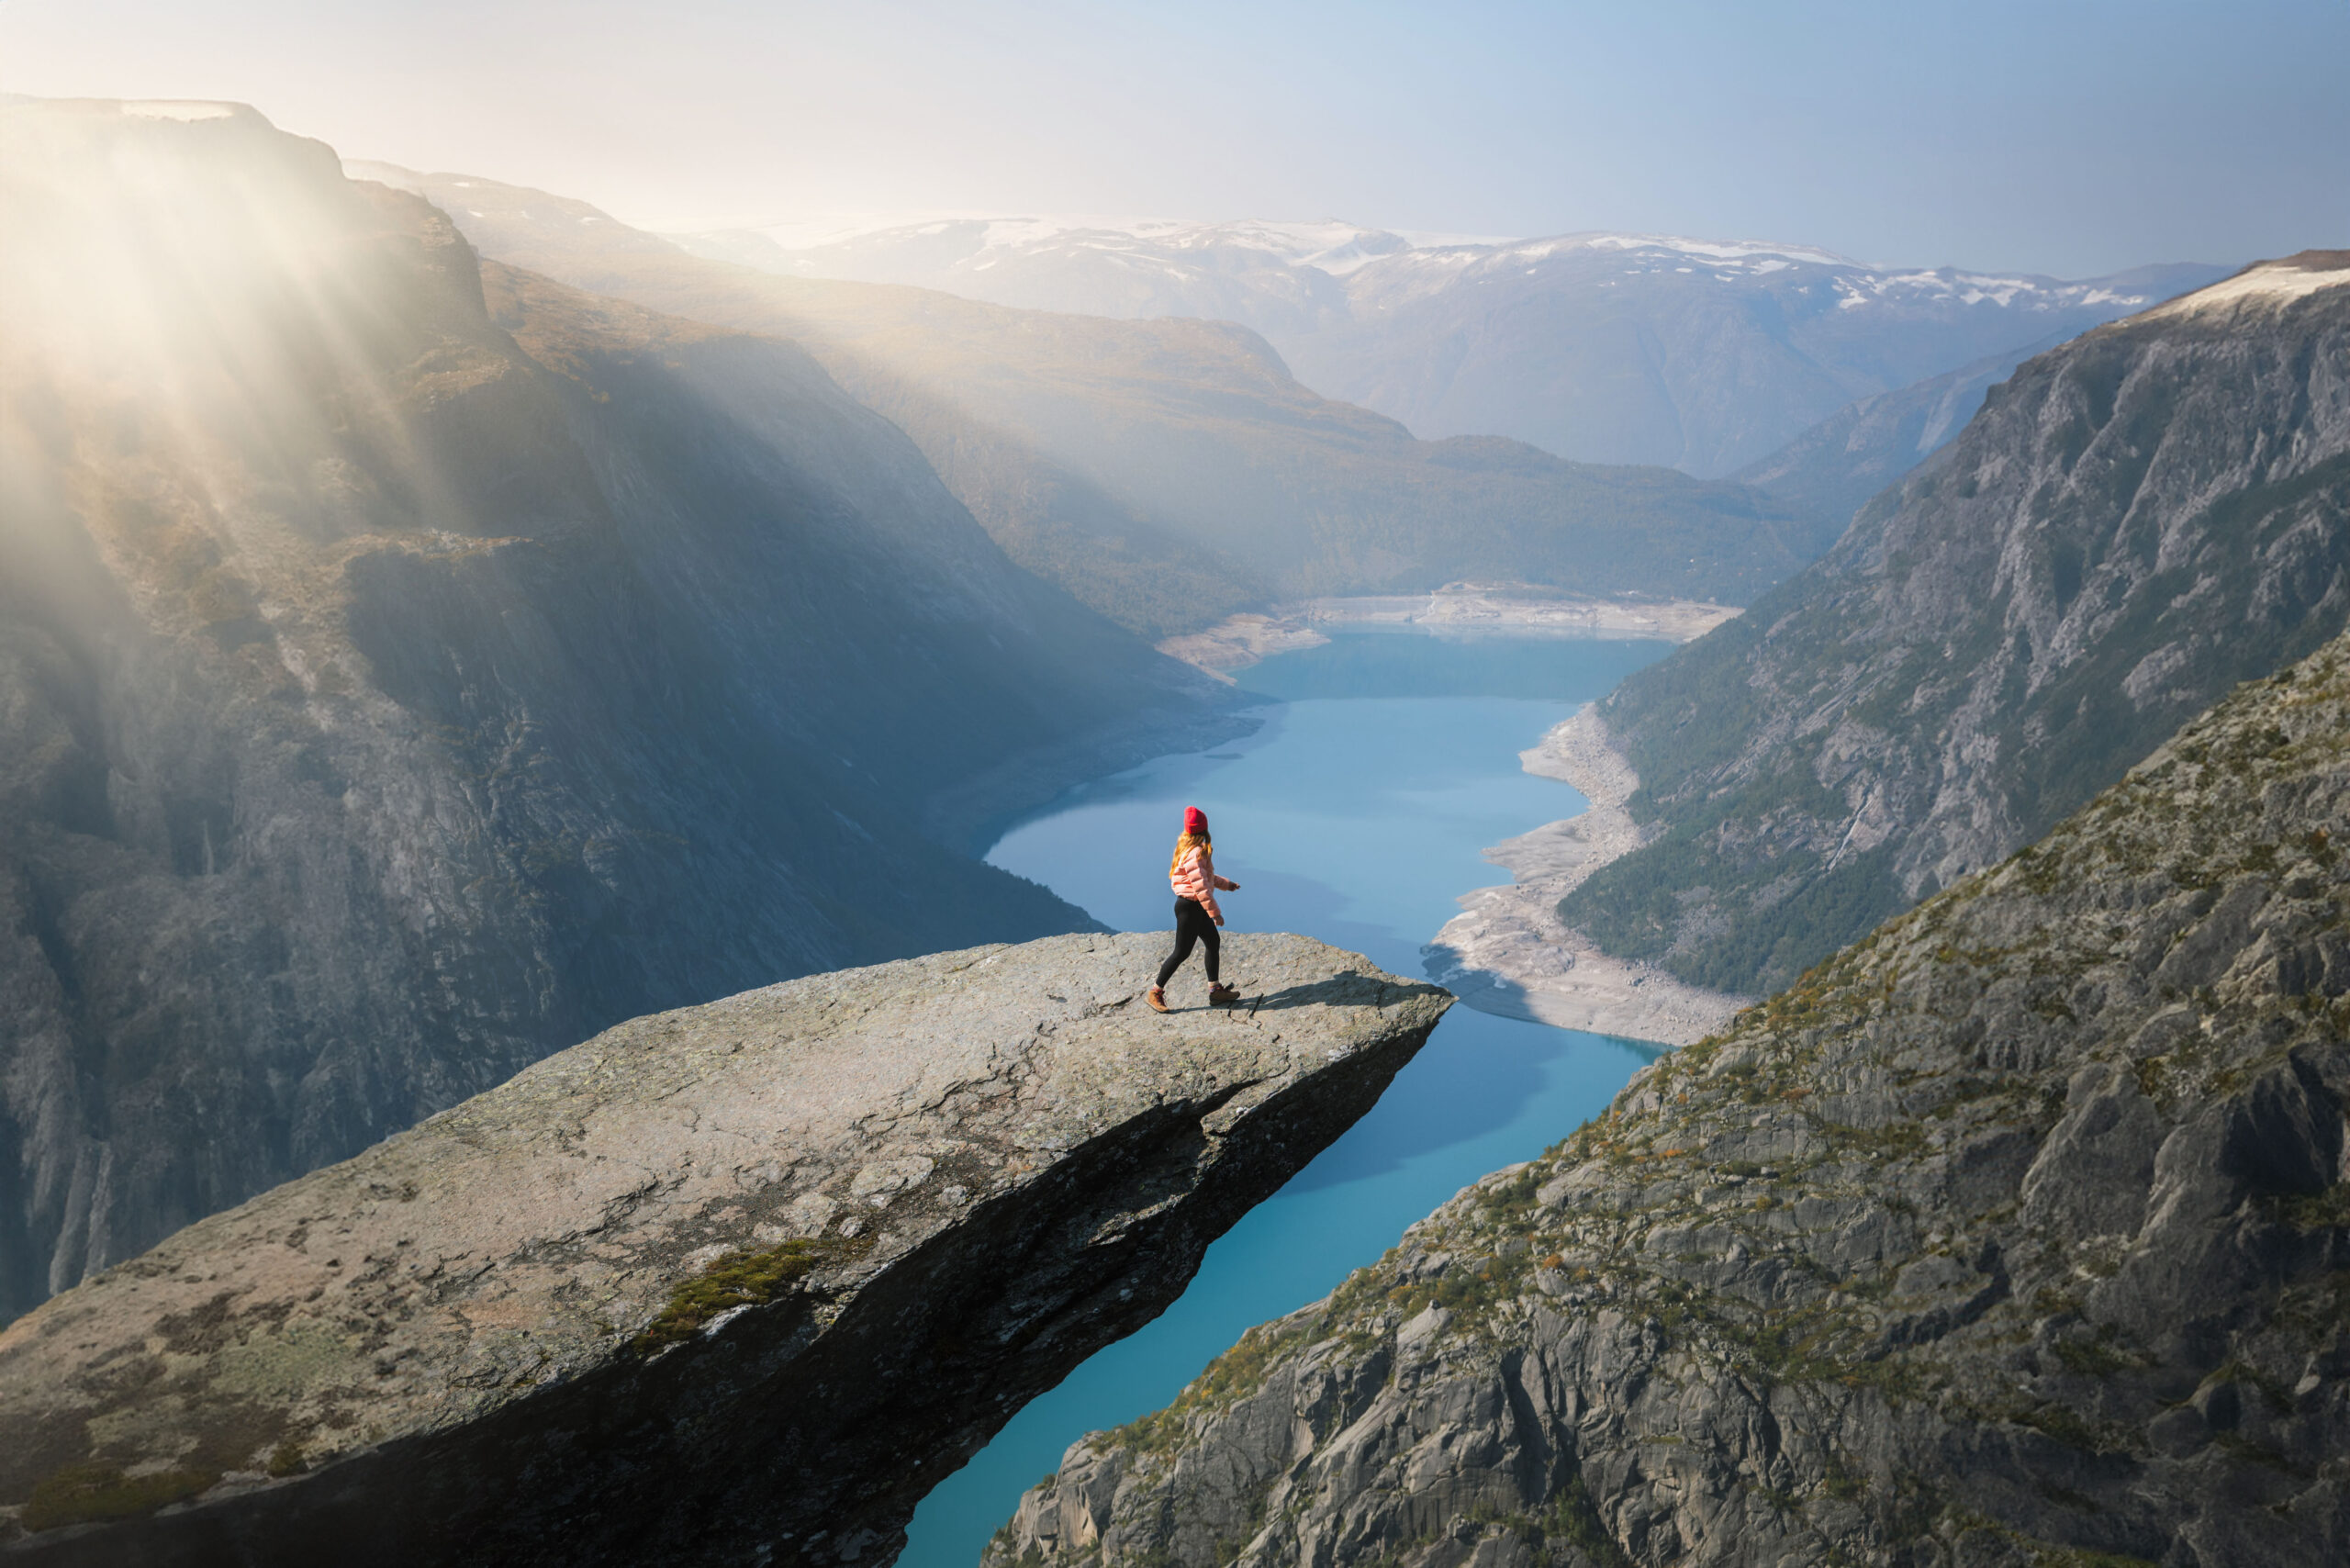
The final kilometer to Trolltunga builds anticipation as glimpses of Lake Ringedalsvatnet appear through gaps in the rocky landscape. The trail narrows and requires careful attention to cliff edges. When Trolltunga first comes into view, the scale is breathtaking—photographs cannot capture the dramatic perspective of standing 700 meters above the lake.
Approaching the rock itself, you'll notice four iron rebar steps installed to facilitate safe access onto the formation. The rock is much wider than it appears in photos, but respect the cliff edges. During my visits, I've observed excellent hiker etiquette—people patiently queue, offer to take photos for others, and maintain safety awareness throughout the experience.
Costs and Parking Options
Complete Cost Breakdown
Understanding the true cost of hiking Trolltunga helps budget your Norwegian adventure effectively. While the hike itself is free, parking and transportation costs can add up quickly. I've calculated total expenses for different approaches based on my multiple visits and current 2025 pricing.
2025 Pricing Structure
P1 Tyssedal
Parking: 300 NOK
Shuttle to P2: 100 NOK
Shuttle to P3: +150 NOK
P2 Skjeggedal
Parking: 500 NOK
Shuttle to P3: 150 NOK
Drop-off fee: 200 NOK
P3 Mågelitopp
Parking: 600 NOK
Road toll: 200 NOK
Pre-booking required
Strategic Parking Advice
After experiencing all parking options, I recommend P2 Skjeggedal for most hikers. It offers the best balance of cost, accessibility, and hiking distance. P3 Mågelitopp, while saving significant hiking time, requires advance booking and sells out a week ahead during peak season, limiting weather flexibility.
For campervan travelers, P1 Tyssedal is your only option, but the shuttle system works efficiently. I always recommend booking shuttle tickets online in advance—the priority boarding makes a significant difference during busy periods. Arriving after 9 AM often means longer waits and potentially full shuttles.
Money-Saving Tips from My Experience
- Start early to catch first shuttles and avoid crowds
- Pack substantial lunch—no food available on mountain
- Share shuttle costs with fellow hikers when possible
- Consider staying in Odda to use public transport options
- Book accommodation early—prices increase during peak hiking season
Accommodation Options
Staying overnight near Trolltunga significantly improves your hiking experience by allowing early morning starts and reducing travel fatigue. I've stayed in various accommodations around Odda and Tyssedal, from budget hostels to mountain lodges. The small Tyssedal Hotel offers convenient access but limited availability, while Odda provides more options and services.
Wild camping enthusiasts can find designated areas near the parking lots, though overnight camping in vehicles is prohibited at the trailheads. Local campgrounds in Odda offer shower facilities and proper rest before the demanding hike. I always recommend at least one night's accommodation—attempting Trolltunga as a day trip from distant cities like Bergen creates unnecessary stress and safety risks.
Essential Gear & Equipment
Footwear: Your Most Critical Choice
After witnessing hikers struggle with inappropriate footwear—from sneakers to fashion boots—I cannot overemphasize the importance of proper hiking boots. The Trolltunga trail demands waterproof, supportive boots with excellent grip for wet rock sections and loose scree. I've seen more hike failures from poor footwear than fitness issues.
Recommended Hiking Boots
Men's Waterproof Hiking Boots
⭐ 4.5/5 (20,001 reviews)
Perfect ankle support for rocky terrain
$49.59
Check PriceWomen's Waterproof Trekking Boots
⭐ 4.4/5 (974 reviews)
Lightweight with excellent grip
$39.99
Check PriceBoth options provide the waterproofing and ankle support essential for Trolltunga's challenging terrain
Beyond basic hiking boots, consider the specific demands of Norwegian terrain. Specialized hiking footwear with proper arch support becomes crucial during 10+ hour hikes. I learned this lesson during my first Trolltunga attempt when inadequate boots led to severe foot pain and nearly forced me to turn back.
Backpack and Carrying System
A proper hiking backpack distributes weight effectively during the long journey to Trolltunga. I recommend 30-35L capacity for day hikers, with external attachment points for trekking poles and extra layers. The backpack should fit comfortably when fully loaded with food, water, and safety equipment for 10+ hours.
Top-Rated Hiking Backpacks
40L Waterproof Hiking Backpack
⭐ 4.6/5 (2,825 reviews) - Amazon's Choice
Includes rain cover and hydration system
$32.38
View Details30L Lightweight Travel Daypack
⭐ 4.5/5 (1,658 reviews)
Ultralight and packable design
$27.99
View DetailsTrekking Poles and Support Gear
Trekking poles proved invaluable during steep descents and stream crossings. They reduce knee strain significantly during the long descent from Trolltunga and provide stability on wet rocks. I initially considered them optional but now consider them essential equipment for this particular hike.
Food and Hydration Strategy
Nutrition planning can make or break your Trolltunga experience. I recommend 3,000-4,000 calories for the day, focusing on easily digestible, energy-dense foods. Trail mix, energy bars, sandwiches, and fruit provide sustained energy without requiring cooking equipment. Pack 20% more food than you think you need—the hike burns more calories than most people anticipate.
Water requirements vary with weather and individual needs, but I typically carry 2-3 liters plus purification options. Norwegian mountain streams provide excellent refill opportunities, but having backup purification ensures water security throughout the hike. Electrolyte supplements help maintain performance during long exertion periods.
Complete Gear Checklist
Want the complete packing checklist used by experienced Trolltunga hikers? Download our comprehensive gear guide with seasonal variations and weight-saving tips.
Get Free ChecklistMy Personal Experience
First Attempt: Lessons Learned the Hard Way
My first Trolltunga attempt in July 2022 taught me valuable lessons about preparation and respect for Norwegian mountains. Starting from P2 Skjeggedal at 8:30 AM with a friend, we underestimated both the physical demands and weather variability. What began as sunny conditions transformed into cold fog and light rain by the time we reached Gryteskaret pass.
The most challenging aspect wasn't the distance but the sustained effort required. Unlike shorter, steeper hikes, Trolltunga demands consistent pacing and energy management over 10+ hours. I remember reaching the halfway point feeling strong, only to hit an energy wall during the final push to the rock formation. This experience emphasized the importance of proper nutrition timing and pacing strategy.
Reality Check from the Trail
"The photos make it look easy, but standing on Trolltunga after hiking 14 kilometers through changing weather conditions, with aching legs and 14 more kilometers back, gives you tremendous respect for this mountain environment. Every step is earned." - Fellow hiker met at the rock
The Trolltunga Community Experience
One unexpected joy of the Trolltunga hike is the camaraderie among fellow hikers. During my 45-minute wait for photos on the rock, I met adventurers from twelve different countries, all sharing stories, snacks, and encouragement. The shared challenge creates instant bonds—everyone helps each other with photos, shares navigation tips, and offers support during difficult sections.
A memorable encounter involved meeting Lars, a local Norwegian guide, during the descent. He shared insider knowledge about weather patterns, optimal photography timing, and historical context of the trail. According to Lars, the ancient trade route across Hardangervidda connected eastern and western Norway for centuries, with modern hikers following paths used by traders and their pack horses.
Honest Pros and Cons Assessment
The Amazing Positives
- Absolutely breathtaking, world-class scenery
- Well-maintained, clearly marked trail system
- Incredible sense of achievement upon completion
- Diverse landscapes from forests to alpine plateau
- Emergency shelters provide safety backup
- Strong hiking community and mutual support
- Excellent photo opportunities throughout route
The Real Challenges
- Extremely long duration—10+ hour commitment
- High parking and transportation costs
- Severe summer crowds and photo queue waits
- Weather can change rapidly, creating dangers
- Limited flexibility due to advance booking requirements
- Physical demands exceed many hikers' preparation
- No facilities or services along entire route
What Other Hikers Are Saying
Based on conversations with fellow hikers and online community feedback, here are three representative experiences that capture the range of Trolltunga adventures:
Maria K. - Amazon Verified Purchase
⭐⭐⭐⭐⭐ "Best hiking experience ever!"
"Completed Trolltunga in September with proper preparation—6 months of training and quality gear. The hike was challenging but incredibly rewarding. Starting at 6 AM from P3, we had perfect weather and minimal crowds. The sense of accomplishment standing on that rock formation is indescribable!"
Jake R. - Reddit r/Norway
⭐⭐⭐⭐☆ "Tough but worth it with caveats"
"Did the hike in July—beautiful but crowded. Waited 70 minutes for photos on a Saturday, which was frustrating after the long hike. The trail itself is fantastic and well-marked. Definitely doable for fit hikers, but start early and consider weekdays if possible."
Anna L. - Quora Travel Community
⭐⭐⭐☆☆ "Beautiful but overwhelming"
"Attempted in August but turned back at Gryteskaret due to weather and feeling unprepared. The initial climb was much steeper than expected. Planning to return next year with better conditioning and proper gear. Don't underestimate this hike—it's no joke!"
My Top Insider Tips
Through multiple Trolltunga experiences and conversations with local guides, I've compiled practical tips that significantly improve your chances of success and enjoyment:
Essential Success Strategies
- Start before 6 AM to avoid crowds and secure better weather windows
- Train specifically for long-duration hiking, not just general fitness
- Pack 25% more food than you think you need—the hike burns serious calories
- Bring trekking poles even if you normally don't use them
- Check weather multiple sources and have flexible backup dates
- Consider September for the best balance of weather and crowds
- Download offline maps as cell service is sporadic throughout the route
Most importantly, approach Trolltunga with genuine respect for the mountain environment. This isn't just a photo opportunity—it's a serious mountain adventure that demands proper preparation, appropriate gear, and realistic expectations. The reward for meeting these challenges is one of the world's most spectacular hiking experiences and memories that will last a lifetime.
Frequently Asked Questions
How difficult is the Trolltunga hike?
The Trolltunga hike is classified as "Very Demanding" due to its 20-28 km distance. While the trail is well-maintained and clearly marked, you need good physical fitness, endurance, and mountain hiking experience. The hike involves significant elevation gain and can take 8-12 hours to complete, making it one of Norway's most challenging day hikes. I recommend previous experience with long-distance hiking and proper training preparation.
What is the best time to hike Trolltunga?
The optimal time for hiking Trolltunga is from June to September when the trail is accessible without a guide. July and August offer the warmest weather but also the largest crowds. I recommend visiting in early June or September for better weather conditions with fewer hikers, though you may encounter some snow patches in June. Avoid Saturdays if possible, as wait times for photos can exceed 90 minutes during peak season.
How much does it cost to hike Trolltunga?
Parking costs vary: P1 Tyssedal (300 NOK), P2 Skjeggedal (500 NOK), or P3 Mågelitopp (600 NOK plus 200 NOK road toll). Shuttle buses cost 100-150 NOK one way. The hike itself is free. Budget approximately 800-1200 NOK total including parking, potential shuttle costs, and food for the day. Additional costs include accommodation if staying overnight near the trailhead.
Do I need a guide for Trolltunga?
From June to September, experienced hikers can tackle Trolltunga independently as the trail is well-marked with red "T" markers. However, from October to May, a guide is strongly recommended due to snow, ice, and shorter daylight hours. First-time mountain hikers should consider guided tours even in summer for safety and local knowledge. The trail crosses exposed terrain where weather conditions can change rapidly.
What should I bring for the Trolltunga hike?
Essential gear includes waterproof hiking boots, layered clothing, rain jacket, plenty of food and water, sunscreen, first aid kit, headlamp, and trekking poles. The weather can change rapidly, so pack for all conditions. Bring extra food as the hike burns significant calories, and fill water bottles from mountain streams along the route. Consider specialized hiking footwear for optimal comfort during the long journey.
Conclusion
Hiking to Trolltunga remains one of Norway's most rewarding yet challenging outdoor adventures. Through my multiple experiences on this iconic trail, I've learned that success depends far more on preparation, respect for mountain conditions, and realistic expectations than on pure physical fitness alone. The 700-meter drop beneath the famous rock formation serves as a powerful reminder of nature's scale and our place within it.
The investment—both financial and physical—required for Trolltunga is substantial. Parking costs, potential shuttle fees, proper gear acquisition, and accommodation expenses can easily exceed 1,500 NOK per person. Factor in the 8-12 hour time commitment and significant physical demands, and Trolltunga becomes a serious undertaking that deserves thorough planning and preparation.
Ready for Your Trolltunga Adventure?
Equip yourself with the right gear and knowledge for this epic Norwegian hiking challenge. From professional hiking boots to route planning expertise, proper preparation transforms challenges into achievements.
However, for those who accept the challenge and prepare appropriately, Trolltunga delivers an unparalleled combination of natural beauty, personal achievement, and unforgettable memories. Standing on that narrow rock tongue, suspended above Lake Ringedalsvatnet with the Norwegian wilderness stretching to every horizon, creates a profound connection with the raw power and beauty of the natural world.
Whether you choose the shorter route from P3 Mågelitopp or embrace the full journey from P2 Skjeggedal, Trolltunga will test your limits and reward your efforts in equal measure. The key lies not in rushing toward the destination, but in appreciating every step of the journey through one of the world's most spectacular mountain landscapes. Consider upgrading your hiking footwear and gear before attempting this challenging adventure.
Last updated: January 8, 2025 | Always check current trail conditions and weather forecasts before hiking. Mountain conditions change rapidly, and local authorities may implement temporary restrictions for safety reasons.